Strap yourselves in for a trip back in time, to when I first began a journey on improving a yoga pose. The pose in question? Baddha Konasana, butterfly pose. You see I’d been doing the pose, but with my knees up around my ears. Then in yoga teacher training, I discovered the correct alignment for butterfly pose. And a journey on releasing my ego, and providing support began.

Instead, I subdued my ego and provided some support for my pelvis to get my knees at the same height as my hip crease. Allowing the muscles around my hips to relax and release their death grip. This meant sitting on a bolster and two blankets. Then I’d sit. either in butterfly or cross-legged, for 5 minutes at the end of every class.
Gradually over the years, I lowered the height of my pelvis inch by inch. Until I was just sitting with my tailbone on a blanket. Then it happened. This week, FIVE YEARS LATER, I was able to get into butterfly pose with no props.
My uber self-critical eye still sees room for improvement, especially on my left leg. But I am celebrating this journey BIGTIME! So, in this post, I want to share with you a few tips to help you work on improving a yoga pose that you’re struggling with.
If you can’t view the embedded video above, you can view the video on YouTube. Maybe add it to a playlist? Above all, remember to subscribe to my channel. New videos are uploaded every Tuesday and Friday. However, for exclusive longer format videos sign up for my Patreon community. Patrons also get early access to all my videos, along with lots of other benefits.
5 tips for improving a yoga pose
Yoga challenges can be great for creating consistency in a home yoga practice. There are tons of yoga challenges online but chances are they don’t cater to your needs. My suggestion is to create your own. So these five tips should help you discover how to put together YOUR yoga challenge so you can get on the journey to improving a yoga pose.
Figure out your pose
Most of us want to get better at the poses we suck at. Honestly my list of poses I want to improve is long. But, I’d advise choosing just 1 or 2 poses to focus on at a time. Think about the pose for you that doesn’t look or feel like it’s “right”. Or perhaps it’s a pose that doesn’t feel strong? Perhaps, it’s a pose doesn’t feel stable? That makes for a great pose for your personal yoga challenge. Let me know in the comments what your pose is and I’ll try and schedule a video about how to help.
Establish a baseline
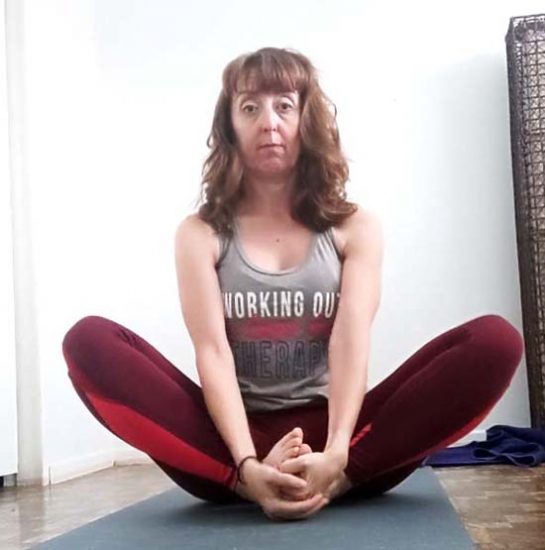
Bear in mind that this journey to improving a yoga pose is likely going to be a long one. And, like any journey you need to have a beginning, a middle and an end. Be honest, where are you starting from? How does the pose look right now? How does it feel? Notice everything in the pose you are trying to improve. Where do you connect to the floor? Are there differences right to left? Then think about how you’ll measure differences. What muscles feel tight like they are gripping and unwilling to loosen? For me I know that butterfly was all about my tight hips and inner thighs. My baseline was no part of my thighs touched the floor and I was wearing my knees as earrings. Even now I feel a difference from side to side. My left hip is less forgiving and still holds tension.
Take before photos/video
One of the biggest regrets I have from this journey is not taking more photos or videos from years ago when I got serious about my yoga practice. Now, I find myself longing for those early records of my baseline. Not only because I would have a good record of my improvement, but so that my story could inspire others. Lesson learned. TAKE PHOTOS. Yeah yeah, you hate photos of yourself… your cellphone selfies might disagree! What we actually hate is taking photos of ourselves when we’re vulnerable. Or, when we’re not good at something. Trust me you’ll thank me in a few weeks, months, years. Document it!
How will you define progress?
Improving a yoga pose means defining what progress will look like. Is it where your body has a connection to the floor? In the case of butterfly pose, the end result is my outer leg connecting to the floor. But there were progress markers along the way. Each time I removed a blanket from under my pelvis, lowering the height, meant there was an improvement. For a balance pose, it could be incrementally increasing the duration of standing in the pose. Those small markers are milestones. Celebrate them!
Time: expectation vs reality
We’ve all seen the marketing gimmicks “You can do the splits in 10 days”. Phooey. I highly recommend making this challenge something you don’t restrict to a time period. Think marathon, not a sprint. Journey, not destination. You probably won’t see or feel a difference in 7 days. Heck, you probably won’t see a difference in 7 weeks. It’s called a yoga PRACTICE for a reason. In my example, it took 5 years! Let go of your ego’s desire to do something “perfect” and instead do what’s right for your body in your practice today.
Put in the work! Just hopping into a pose daily and expecting fast results is unrealistic. There are other things to consider. Like taking the time to warm up, releasing tight muscles, plus working on variations and modifications. Athletes get better because they practice EVERY DAY. Even on the recovery days, they are foam rolling, getting massages, infra-red therapy, etc. There are other ways of working towards your pose than just being IN your pose! Sometimes you gotta get outside the box.
Improving a yoga pose involves you putting the work in every day. If you’re consistent, long term, things will happen. Success never happens overnight. It takes hard work, dedication, and consistency. But remember to enjoy the journey.
Questions
- What yoga pose are you trying to improve?
- Are you putting the work in to make it better?
- Do you do before/after photos?
 How to find time for yoga & create your home practice